> ## Documentation Index
> Fetch the complete documentation index at: https://nightly-mint.classiq.io/llms.txt
> Use this file to discover all available pages before exploring further.
# Execution
The platform allows you to execute quantum programs on quantum hardware or simulators of your choice.
## Usage
The input for the execution is a Classiq quantum program, which is the result of synthesizing a quantum model (see [Quantum Program Synthesis](/user-guide/synthesis/index)).
When designing your model, do not forget to include [execution primitives](/user-guide/execution/primitives) such as `sample`.
When viewing a quantum program in the "Quantum Program" page, after synthesizing your model or uploading your quantum program file, click "Execute":
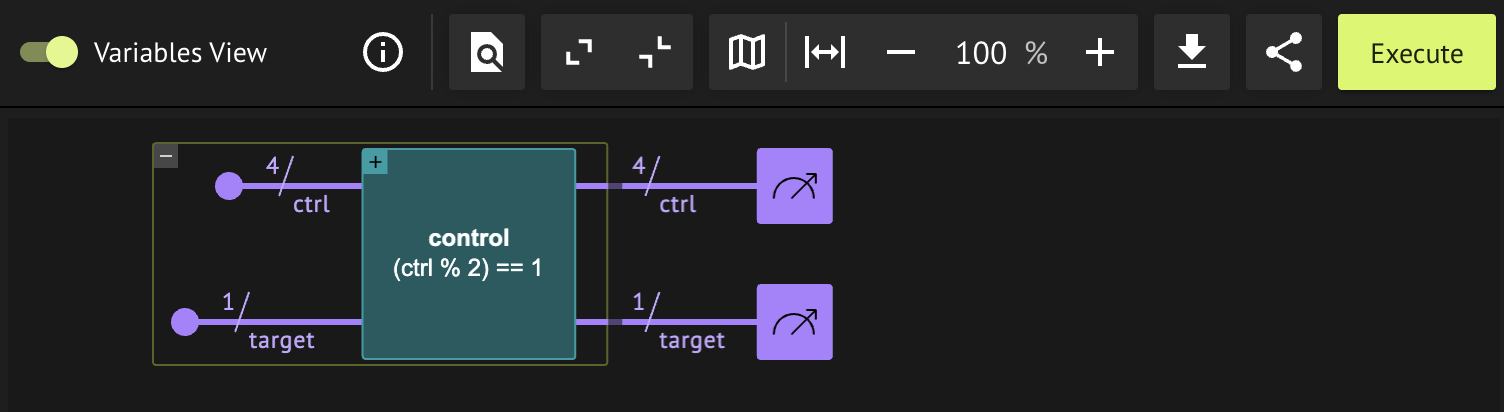 In the next screen you can choose your execution preferences and run your quantum program.
[comment]: DO_NOT_TEST
```python theme={null}
from classiq import *
# Design your quantum model
@qfunc
def main(res: Output[QBit]) -> None:
allocate(res)
# Synthesize a quantum program from the quantum model
quantum_program = synthesize(main)
# Execute the quantum program and access the result
ex = execute(quantum_program)
results = ex.result()
```
### Execution Preferences
You can configure the execution process by modifying the execution preferences with the function [`ExecutionPreferences`](/sdk-reference/execution#classiq.execution.ExecutionPreferences).
The main execution preferences:
* Backend preferences, such as provider, backend name, and credentials. See [Cloud Providers](/user-guide/execution/cloud-providers/index).
* Number of shots to use.
* Job name to use.
* Transpilation options. You can set the transpilation level (and whether or not to transpile) in the Classiq executor
by setting the `transpile_to_hardware` field (shown as the "Transpilation Option" field in the IDE execution page).
For more information on the transpilation levels, see [quantum program transpilation](/user-guide/synthesis/quantum-program-transpilation).
Choose your backend preferences in the "Execute Quantum Circuit" window:
In the next screen you can choose your execution preferences and run your quantum program.
[comment]: DO_NOT_TEST
```python theme={null}
from classiq import *
# Design your quantum model
@qfunc
def main(res: Output[QBit]) -> None:
allocate(res)
# Synthesize a quantum program from the quantum model
quantum_program = synthesize(main)
# Execute the quantum program and access the result
ex = execute(quantum_program)
results = ex.result()
```
### Execution Preferences
You can configure the execution process by modifying the execution preferences with the function [`ExecutionPreferences`](/sdk-reference/execution#classiq.execution.ExecutionPreferences).
The main execution preferences:
* Backend preferences, such as provider, backend name, and credentials. See [Cloud Providers](/user-guide/execution/cloud-providers/index).
* Number of shots to use.
* Job name to use.
* Transpilation options. You can set the transpilation level (and whether or not to transpile) in the Classiq executor
by setting the `transpile_to_hardware` field (shown as the "Transpilation Option" field in the IDE execution page).
For more information on the transpilation levels, see [quantum program transpilation](/user-guide/synthesis/quantum-program-transpilation).
Choose your backend preferences in the "Execute Quantum Circuit" window:
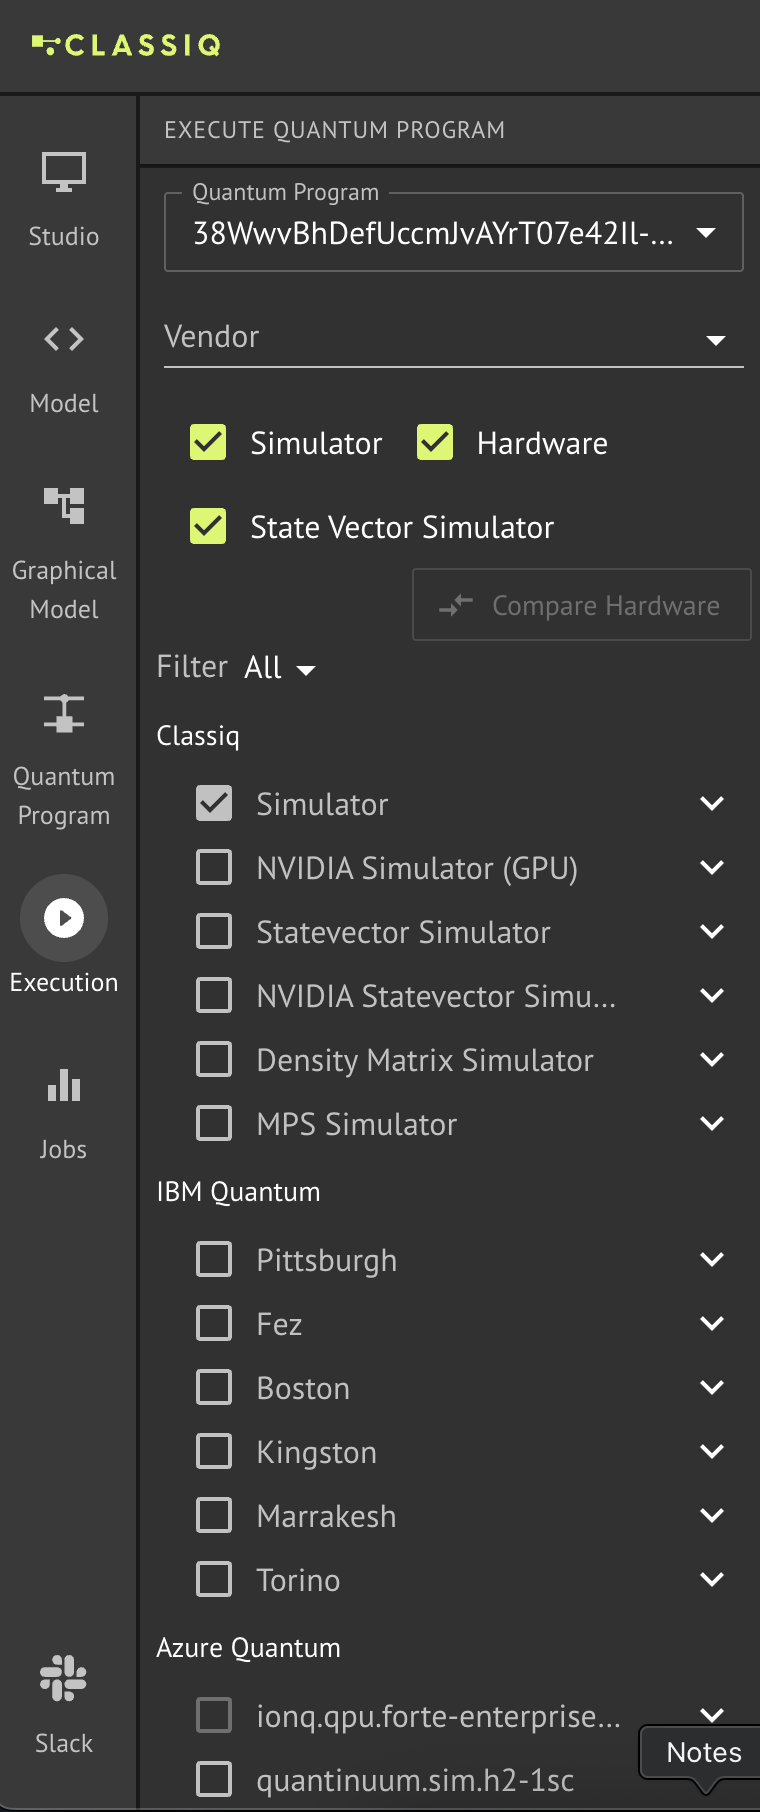 You can select more than one backend on which to run, but note that a maximum of five backends can be selected at a time.
Optionally configure more execution preferences in the "Execution Configuration" window:
You can select more than one backend on which to run, but note that a maximum of five backends can be selected at a time.
Optionally configure more execution preferences in the "Execution Configuration" window:
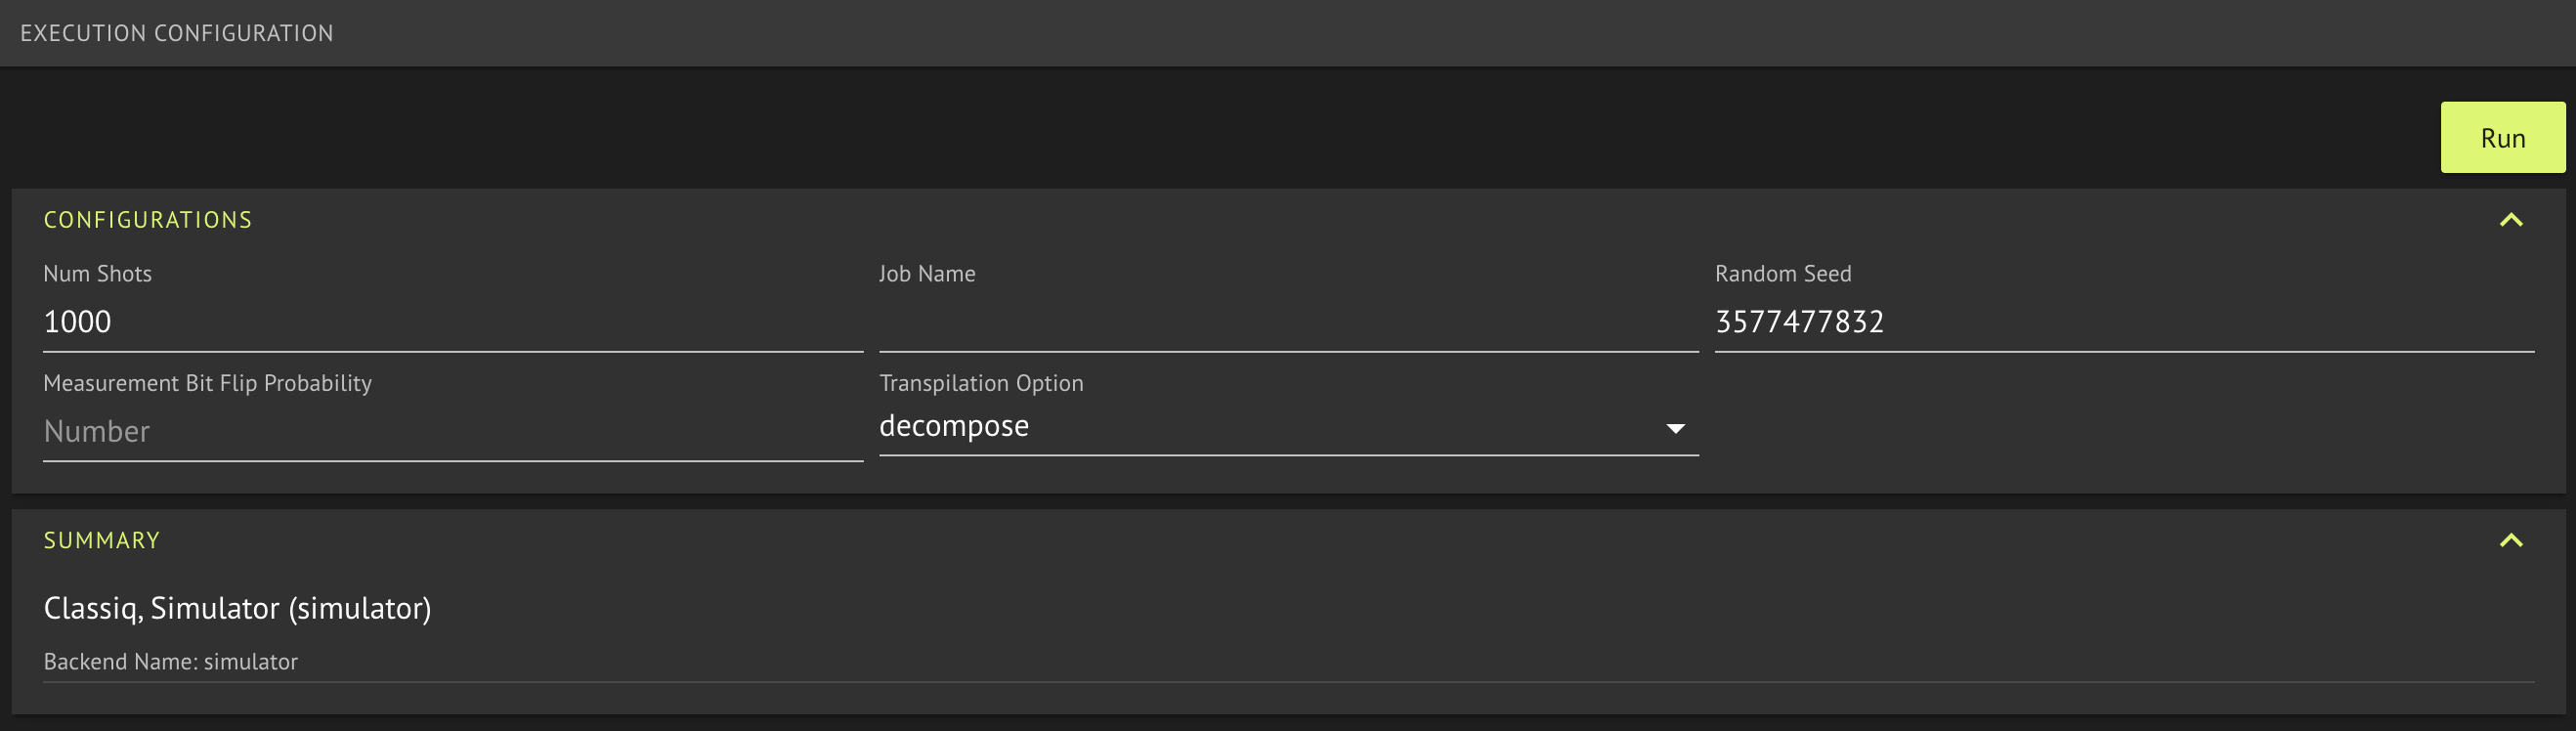 Finally, execute your program by clicking "Run".
You can set your execution preferences in the quantum model before the synthesis, as in this example:
[comment]: DO_NOT_TEST
```python theme={null}
from classiq import *
# Define execution preferences
execution_preferences = ExecutionPreferences(
num_shots=1000
) # set your real preferences instead!
# Set the execution preferences
with ExecutionSession(qprog, execution_preferences=execution_preferences) as es:
results_more_shots = es.sample()
```
If not specified, the default backend is Classiq's simulator, which doesn't require any provider credentials.
### Jobs
You can view all your execution jobs from any device in the IDE and the SDK,
regardless of whether they were originally sent via the IDE or the SDK.
The IDE automatically shows all your execution jobs in the "Jobs" tab.
You can choose any execution job to view its results, rename it, or delete it
from the list.
The `execute` function returns an `ExecutionJob` object.
To query your previous execution jobs, use the `get_execution_jobs`
function:
```python theme={null}
from classiq import get_execution_jobs
jobs = get_execution_jobs()
```
Use the `offset` and `limit` parameters to control paging of the returned
jobs (by default, only the newest 50 jobs are returned).
It is possible to rename an execution job (`rename`) and
open it in the IDE for better visualization (`open_in_ide`).
If you want to retrieve a specific execution job, you can use its identifier
like this:
[comment]: DO_NOT_TEST
```python theme={null}
from classiq import ExecutionJob
job = ExecutionJob.from_id("00000000-0000-0000-0000-000000000000")
```
See also [`get_execution_jobs` reference](/sdk-reference/execution#classiq.execution.jobs.get_execution_jobs)
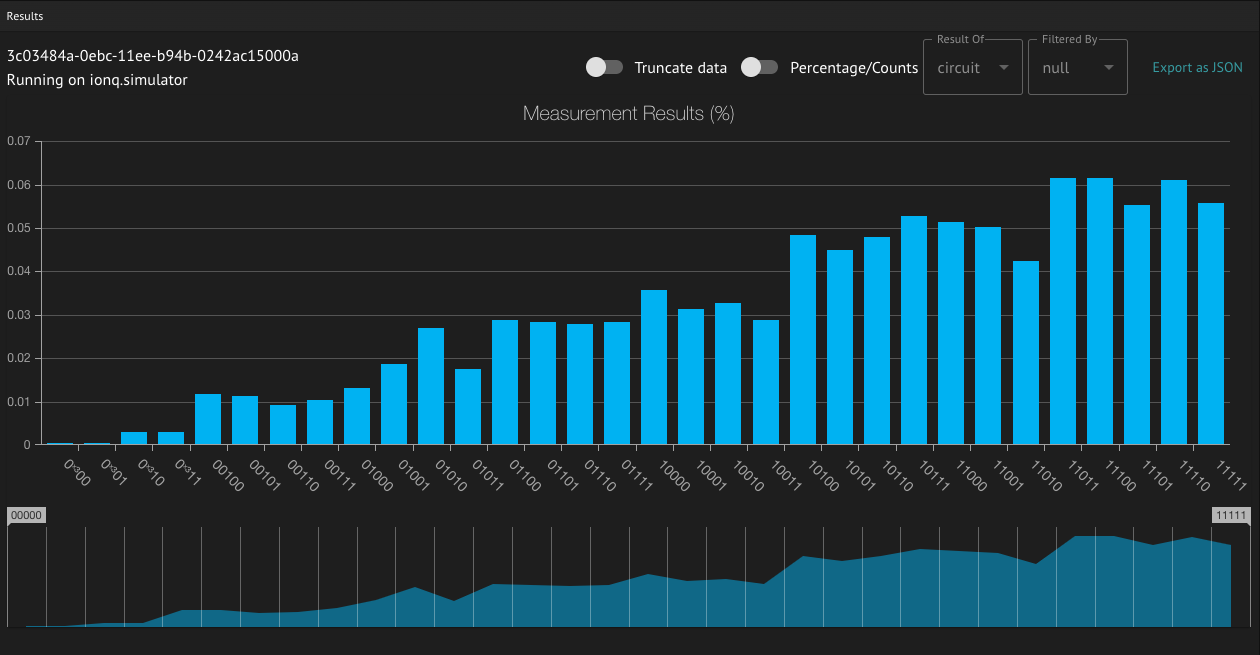
### Results
The IDE shows a visualized view of each result returned from execution.
The most common result type is the measurements of your quantum program:
Finally, execute your program by clicking "Run".
You can set your execution preferences in the quantum model before the synthesis, as in this example:
[comment]: DO_NOT_TEST
```python theme={null}
from classiq import *
# Define execution preferences
execution_preferences = ExecutionPreferences(
num_shots=1000
) # set your real preferences instead!
# Set the execution preferences
with ExecutionSession(qprog, execution_preferences=execution_preferences) as es:
results_more_shots = es.sample()
```
If not specified, the default backend is Classiq's simulator, which doesn't require any provider credentials.
### Jobs
You can view all your execution jobs from any device in the IDE and the SDK,
regardless of whether they were originally sent via the IDE or the SDK.
The IDE automatically shows all your execution jobs in the "Jobs" tab.
You can choose any execution job to view its results, rename it, or delete it
from the list.
The `execute` function returns an `ExecutionJob` object.
To query your previous execution jobs, use the `get_execution_jobs`
function:
```python theme={null}
from classiq import get_execution_jobs
jobs = get_execution_jobs()
```
Use the `offset` and `limit` parameters to control paging of the returned
jobs (by default, only the newest 50 jobs are returned).
It is possible to rename an execution job (`rename`) and
open it in the IDE for better visualization (`open_in_ide`).
If you want to retrieve a specific execution job, you can use its identifier
like this:
[comment]: DO_NOT_TEST
```python theme={null}
from classiq import ExecutionJob
job = ExecutionJob.from_id("00000000-0000-0000-0000-000000000000")
```
See also [`get_execution_jobs` reference](/sdk-reference/execution#classiq.execution.jobs.get_execution_jobs)
### Results
The IDE shows a visualized view of each result returned from execution.
The most common result type is the measurements of your quantum program:
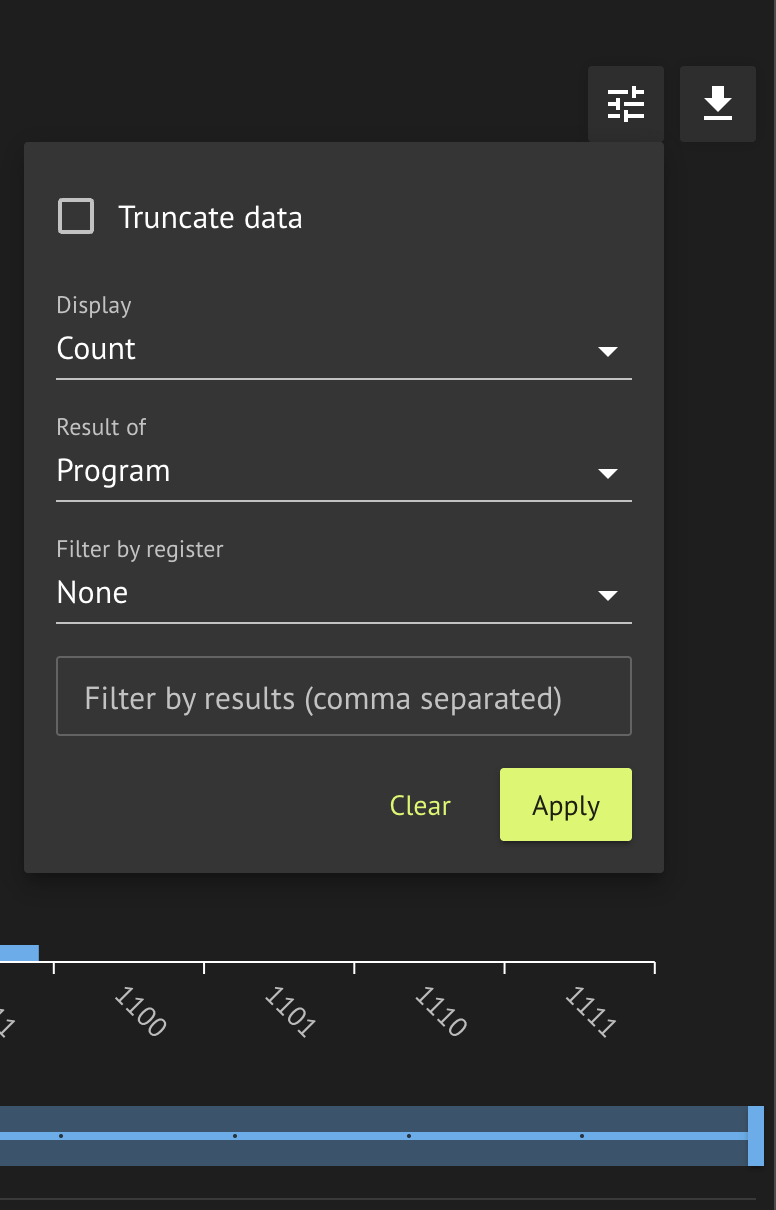
 It is possible to filter the results by specifying them:
 Once you have an `ExecutionJob` object (from the `execute` function or from
querying previous jobs), you can retrieve its result using the `result()`
method, which takes an optional argument `timeout_sec` specifying the
polling timeout in seconds (0 means to poll once and return).
The execution job result contains all the saved results from the execution process in a list.
Each result is a `SavedResult` object with these fields:
* `name`
* `value`: The result object.
* `value_type`: The result type, which is one of the values of the `SavedResultValueType` enum.
Results can be inspected and manipulated in a [pandas DataFrame](https://realpython.com/pandas-dataframe/) by running:
[comment]: DO_NOT_TEST
```python theme={null}
res = job.get_sample_result()
df = res.dataframe
```
For sample jobs, you can retrieve the actual circuits that were submitted to the provider (after transpilation and parameter assignment) using `get_submitted_circuits()`. Each returned circuit supports `to_qasm()` and `to_qiskit()`:
[comment]: DO_NOT_TEST
```python theme={null}
circuits = job.get_submitted_circuits()
for circuit in circuits:
qasm_str = circuit.to_qasm()
qc = circuit.to_qiskit() # Qiskit QuantumCircuit
```
### Cancellation
You can cancel your execution job from both the IDE (by clicking "Cancel" in the job view) and SDK (by using the `job.cancel` method).
Cancelling an execution job will abort the execution process and try to cancel any ongoing jobs sent to the provider during this execution.
Thus, cancelling a job might not be immediate, and you may continue polling the job to ensure its cancellation. This is the default behavior in the IDE, and in the SDK you can use the `job.poll` method.
Built with [Mintlify](https://mintlify.com).
Once you have an `ExecutionJob` object (from the `execute` function or from
querying previous jobs), you can retrieve its result using the `result()`
method, which takes an optional argument `timeout_sec` specifying the
polling timeout in seconds (0 means to poll once and return).
The execution job result contains all the saved results from the execution process in a list.
Each result is a `SavedResult` object with these fields:
* `name`
* `value`: The result object.
* `value_type`: The result type, which is one of the values of the `SavedResultValueType` enum.
Results can be inspected and manipulated in a [pandas DataFrame](https://realpython.com/pandas-dataframe/) by running:
[comment]: DO_NOT_TEST
```python theme={null}
res = job.get_sample_result()
df = res.dataframe
```
For sample jobs, you can retrieve the actual circuits that were submitted to the provider (after transpilation and parameter assignment) using `get_submitted_circuits()`. Each returned circuit supports `to_qasm()` and `to_qiskit()`:
[comment]: DO_NOT_TEST
```python theme={null}
circuits = job.get_submitted_circuits()
for circuit in circuits:
qasm_str = circuit.to_qasm()
qc = circuit.to_qiskit() # Qiskit QuantumCircuit
```
### Cancellation
You can cancel your execution job from both the IDE (by clicking "Cancel" in the job view) and SDK (by using the `job.cancel` method).
Cancelling an execution job will abort the execution process and try to cancel any ongoing jobs sent to the provider during this execution.
Thus, cancelling a job might not be immediate, and you may continue polling the job to ensure its cancellation. This is the default behavior in the IDE, and in the SDK you can use the `job.poll` method.
Built with [Mintlify](https://mintlify.com).